
Are you searching the internet about how to install torque converter on predator 212? Well, look no further because in this go-kart guide we will tell you exactly how to do so.
My name is Stephen and I am a certified mechanic. The most common problem that most people face while installing a torque converter is that they either install the whole thing incorrectly which in turn leads to malfunctioning and in some cases they might feel shuddering and the ride seems to slip while turning. In some cases, incorrectly installed torque converters have caused severe accidents. That is why it is recommended to follow the instructions closely or get a professional to install it for you.
So, to overcome all of the issues that the users face, I have created a step-by-step guide that will help you correctly install a torque converter on your predator 212. So, without further ado, let’s hop in.
Keep in mind that you should not install the 40 series torque converter like we are showing you to. Instead, you should read this article for installing a 40 series CVT.
Materials Required

Tools Required

Step By Step Guide To Install Torque Converter On Predator 212
Now that you have all the necessary materials and tools with you, it is time to install the torque convertor on your predator 212.
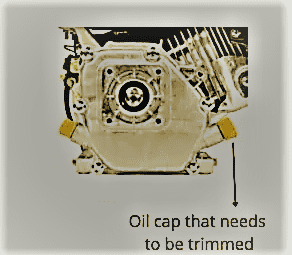
Cut The Edges Of Plastic Oil Caps
Once you have everything in your hand, you should use a Dremel grinder or a cutter to remove the edges of the plastic oil cap that is located within the engine. In order to prevent the edge of the cap from rubbing against the backplate of the torque converter, it must have its edges cut in order to avoid unnecessary damage.
Apply Anti Seize On Bolts
Make sure that all of the bolts have anti-seize applied to them so that they won’t get trapped or stuck in the engine and will be easy to remove when you try to disassemble them or take them out. Lubricating the bolts also makes sure their smooth and easy installation.
Align The Backplate
Next, you should consider aligning the backplate of the converter with the Engine’s Crankshaft to make sure that the lower middle holes of the backplate come in contact with the holes of the engine. In other words, align the torque converter’s holes properly with that of the engine. This is something that has to be done in order for the torque converter to be properly installed. If you fail to fit it perfectly, chances are that the torque converter will slip away while riding.

Tighten The Bolts
Once the backplate is aligned, you need to tighten the (5/16 4 Hex Cap Bolts) by placing the lock washer between the bolts and plates. Keep in mind that the bolts must be tightened perfectly. Avoid overclocking the bolts, and do not apply extra tightening force on them. Also, tighten the bolts one by one by equally tightening them. You don’t want to fully tighten only one and then tighten the other. If you do so, the bolts won’t align perfectly.
Slide The Jackshaft
Once the bolts are tightened, the next thing to do is to slide the jackshaft into the back or rear end of the aluminum plate. Keep in mind that the jackshaft isn’t exactly cylindrical and both ends have different diameters. The broader end comes with a circlip on it. Slide the jackshaft in a way that the end with the circlip can be seen from behind the aluminum plate while the smaller end can be seen from the front.
Slid The Shaft Key
The next step is to slip in the shaft key along with the keyed washer on the jackshaft from the front. After that, you should install the sprocket on the jackshaft through proper alienation of the key and the hole. Next, install the pulley firmly on the jackshaft.
Tighten Nyloc Nut
Once the pulley is installed, it is time to slide the washer on top of the jackshaft and tighten the nylock nut.

As a starting point, see the Comet 30 series diagram above. The driven pulley is represented by the numbers 15-19 in the parts list, the jackshaft is represented by the number 22, a sprocket is represented by the number 24, the key is represented by the number 20, and the Nylock nut is represented by the number 12, and the washer is represented by the number 14. There is no need to be concerned about the other components since they are all contained in a single package.
Installing The Driver Clutch
For installation of the driver clutch, all that you have to do is install the ¾” washer and spacer on the driving rod or crankshaft. These washers and spacers will allow you to properly align the pulleys and will give you enough room and space between both the nuts and the driver’s fixed parts. If you see that the pulley isn’t properly aligned and there is some kind of misalignment even after placing the washer, you have to remove that spacer and washer.
You can see that the fixed part of the driving pulley isn’t installed anywhere. But you needn’t worry because you have to install that in a way that its cylindrical shaft is facing outwards and the plate must be placed closer to the engine. You might also not that the driving pulley is keyed, so align it properly with the crankshaft. After that, slide on the brass bushing.
Install The Belt
Once that is done, the next step is to install the rubber belt. Keep in mind that in the case of the 30 series, the belt is asymmetric meaning that one end of the belt is tapered and comes with an angle. So, the flat side of the belt must be placed towards the engine meaning that it will be in direct contact with the pulley’s fixed part while the taped side will be in contact with the movable parts including the clutch and movable half.
Slide The Pulley On The Hub
Once that is done, install the movable pulley on the hub and place a notched black washer on the driver’s clutch i.e.; on the movable part. Use a lock and flat washer to fix the driver clutch with the bolt. After that tighten the nylock nut with the sprocket or washer.
Keep in mind not to use this guide to assemble a 40-series torque converter. Also, avoid installing the hub and driver clutch before installing the belt as will cause immense damage to the belt. Also, avoid hammering the jackshaft into the drive. Do not at any cost, use the hammer to install any component. Additionally while installing make sure that the pulley is aligned perfectly. For alienation, using the washers and spacers is recommended in some cases. An unaligned pulley will wear out your belt which could cause serious loss and could result in unwanted injuries or a broken pulley.
Final Thoughts
Once the converter is installed, you need to check if it moves in and out freely. If it’s not moving, you have to check and make sure that there are no damages on the bolts and screws, especially the anti-seize. In case of damages, you have to fix them immediately by replacing them with new ones. The bolts can be tightened too much that they will explode while moving which can cause serious injuries.